

Header Video Design In Adobe
If you're a YouTuber and you need a banner for your channel, in this tutorial I'll show you how to make a banner in Photoshop. I will show you one way of doing it, and then you can use this file as a YouTube banner template to adjust to your needs.
And if you want to save time, Envato Elements offers plenty of fantastic templates for YouTubers—for banners, thumbnails, and end screens!

What You Will Learn in This YouTube Banner Photoshop Tutorial
- How big is a YouTube banner?
- How to create your own YouTube banner template
- How to make a banner in Photoshop
Follow along with us over on our Envato Tuts+ YouTube channel:
Tutorial Assets
The following assets were used during the production of this tutorial:
- City Landscape background
- A skyscraper in the worm's eye view
- Multiple skyscrapers seen from the street
- Skyscrapers and trees
- Snowy mountains
- URW Gothic L Book Font
How to Make a Banner in Photoshop
Step 1
A YouTube banner has to have specific dimensions—to make sure it will work great on all devices, you should make it 2560 x 1440 px. So start by creating a 2560 x 1440 px document in Photoshop with the following configuration. Set the Background Fill Color to #333333.


Step 2
Add the background and adjust its size. Then Rasterize the layer (right click > Rasterize layer) and subsequently desaturate the image (Shift-Command-U).


Step 3
Now add a Layer Mask from the Layers panel and apply a Radial Gradient with the Gradient Tool (G) using the front black color. Then set the layer Opacity to 80%.


Step 4
Let's create the boxes to place the stock images. Draw a rectangle with the Rectangle Tool (U) and set the Stroke thickness to 20 px; any fill color will do.


Step 5
Apply a Drop Shadow to the rectangle using the Blending options, using the following values:


Step 6
Import the first stock image and place it over the rectangle. Rasterize the image (Layer > Rasterize > Layer) and then desaturate the layer (Shift-Command-U).


Step 7
Now create a ClippingMask with the rectangle below (right click > Create Clipping Mask) to enter in the box.


Step 8
Draw another rectangle around the frame with a 1 px Stroke thickness (#FFFFFF) and no fill color. Then Group the rectangle, the image, and the frame (Command-G).


Step 9
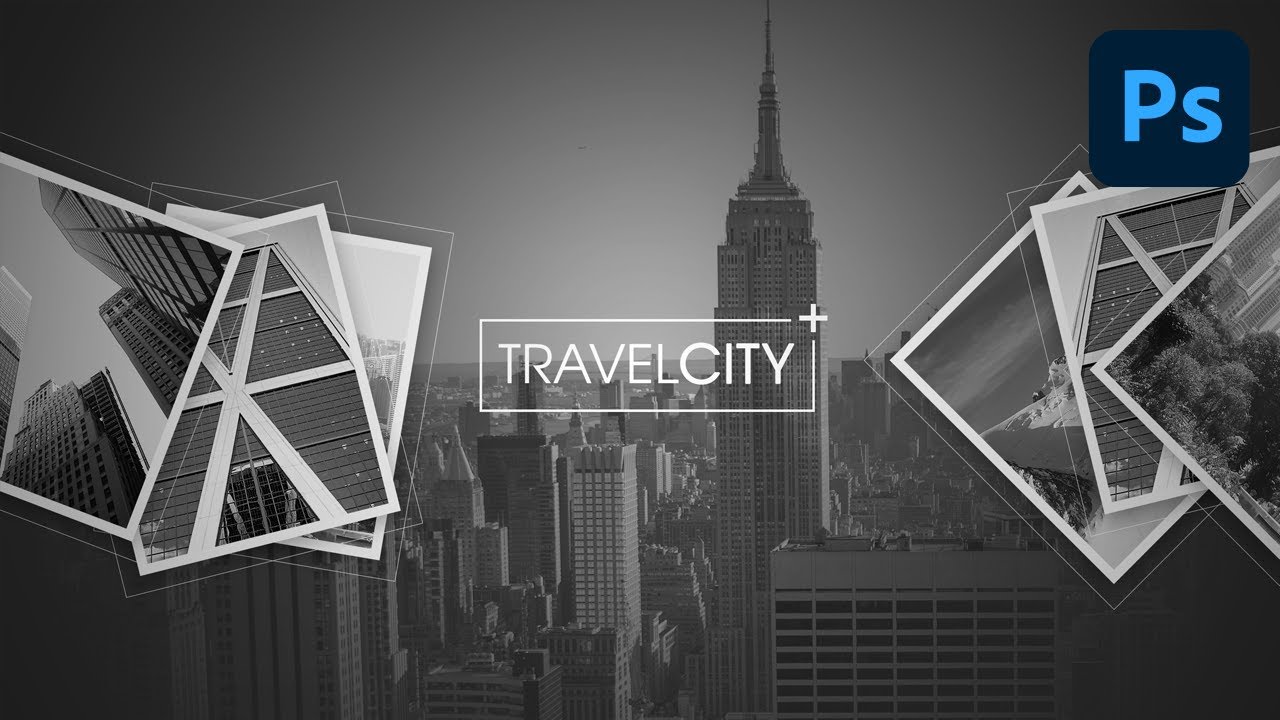
Make six copies of the portrait (Command-J) and place the rest of the stock images in each of the portraits. Then Rotate and place them as shown in the image below.
Be sure to frame the images well in the box and to desaturate them.


Step 10
Create a text title called "TRAVELCITY" with the Horizontal Type Tool (T) and apply Bold to the word "CITY".


Step 11
Take the Pen Tool (P) and draw a 5 px thick frame around the text title, leaving the upper right corner open. Then draw a cross with a Stroke thickness of 10 px.


Step 12
Now we are going to create a vignette. To do so, create a Gradient layer from the Layers panel using the black color as the front, and apply the following settings.


Congratulations! You're Finished!
And that's it! Now you know how big a YouTube banner is, and how to create it on your own in Photoshop.


YouTube Banner Templates & More
If you prefer to use a template for your YouTube banner, you'll find plenty of great options on Envato Elements!
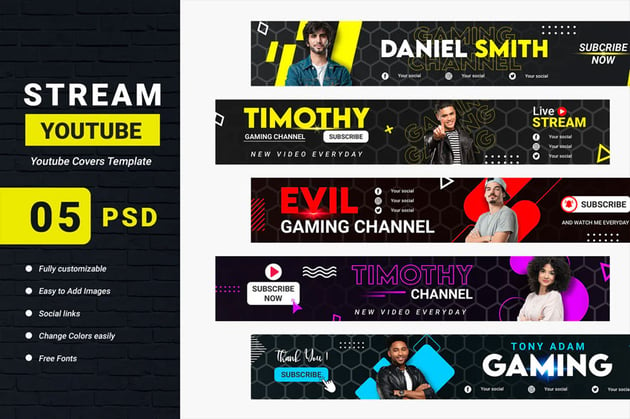
Streaming Channel YouTube Banner Template (PSD)
Streaming is very popular nowadays, so you have to make your banner stand out if you want to attract viewers to your channel. This set will be perfect for this purpose—the bright colors on black backgrounds make these banners pop!
Modern YouTube Banner Template (AI, EPS, PSD)


This set contains five templates for YouTube banners. Their universal style makes them great for any type of channel, especially if you're going for a modern look.
Minimalistic YouTube Banner Template (AI, EPS, PSD)


If you want to stand out, these banner templates are truly unique. They're minimalistic, but that's exactly their power—everything in them serves a function, and they're clean and to-the-point.
Neon YouTube Thumbnails (PSD, PDF)


Enough about banners—if you have a YouTube channel, you also need engaging thumbnails. Envato Elements offers templates for them as well! For example, this set is bright and colorful, instantly dragging attention to your content.
Multi Gradients: YouTube End Screens Vol.2 (AI, EPS, JPG, PNG, PSD)


After your video ends, you can make the viewer more interested in your content by making your end screen look captivating. This set of colorful end screens will help you achieve this goal!
More YouTube Tutorials
Want more YouTube banners and other YouTube-related stuff? Check out the following articles:
Header Video Design In Adobe
Source: https://design.tutsplus.com/tutorials/how-to-create-a-youtube-banner-in-adobe-photoshop--cms-28513
Posted by: williamsstalow.blogspot.com
0 Response to "Header Video Design In Adobe"
Post a Comment